Welcome to all my new followers, hope you enjoy the journey.
at Crafty Cardmakers.
Angela (me actually!), is hosting today and our challenge is Anything but a Card.
As usual you can enter anything you fancy, it doesn't have to be cards, as long as it meets the challenge.
As usual you can enter anything you fancy, it doesn't have to be cards, as long as it meets the challenge.
Hope you will join in.
And here is my project for the challenge:
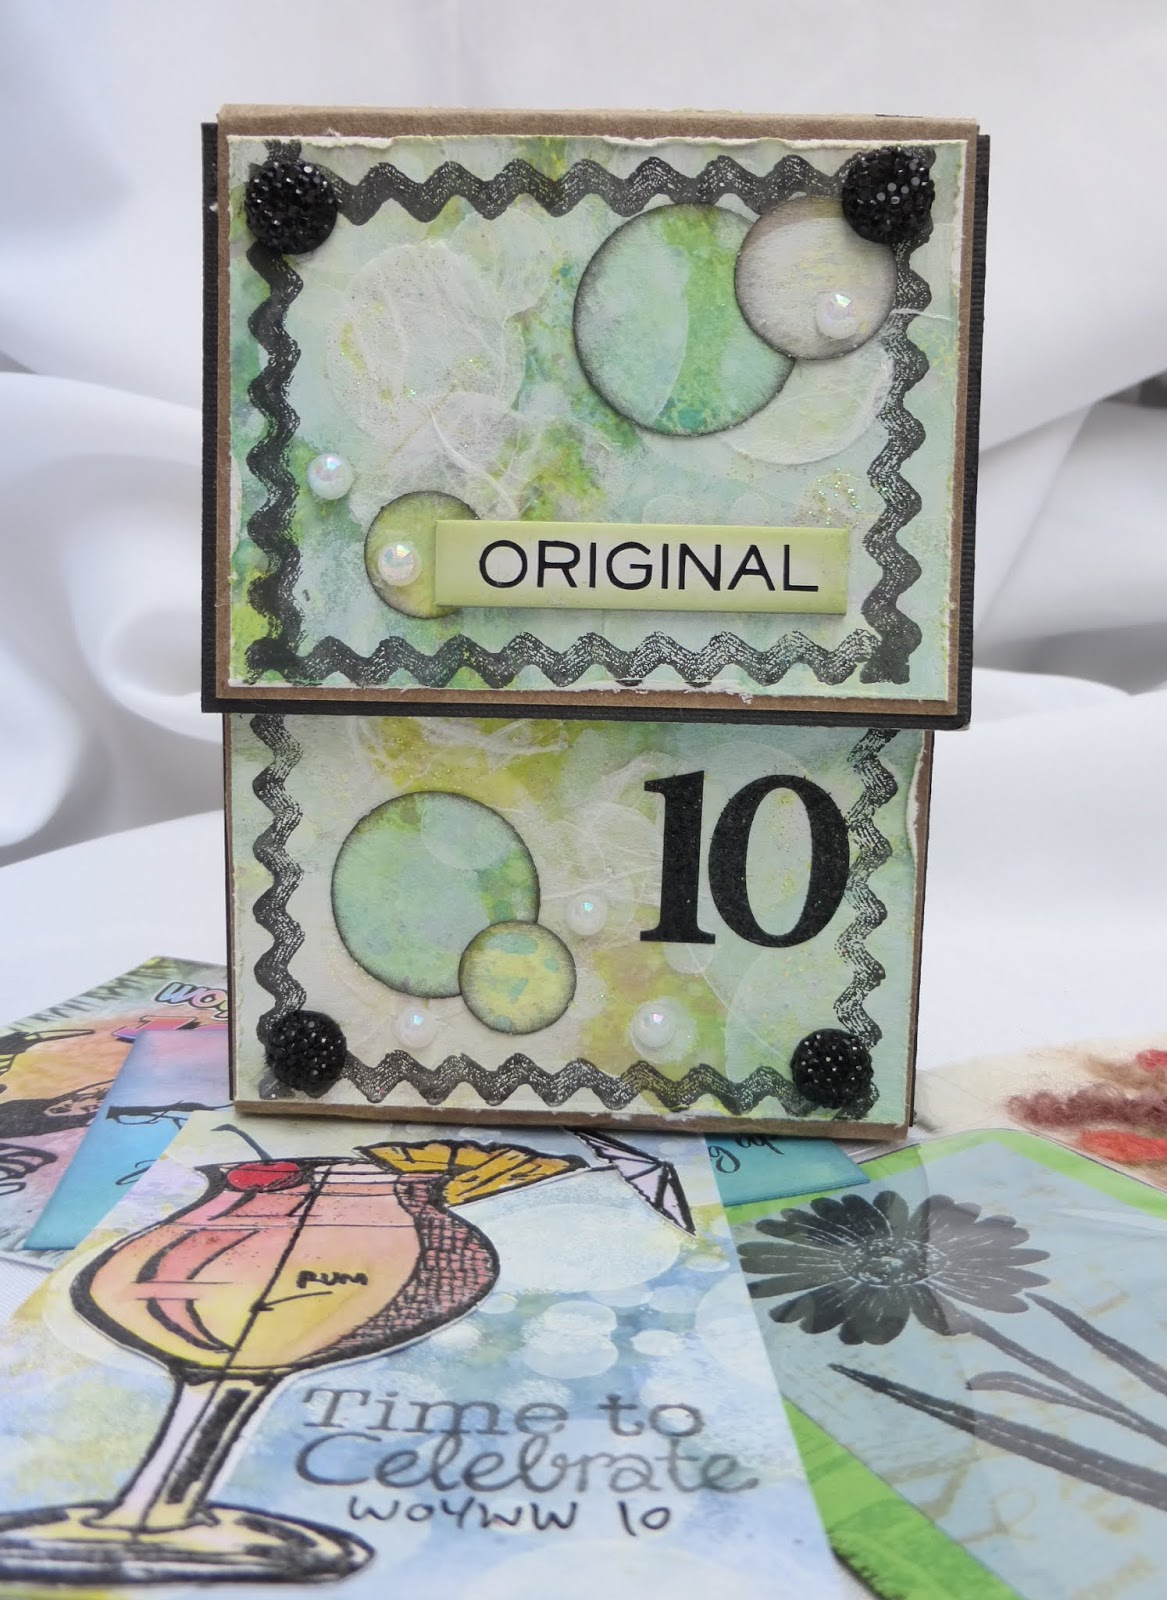
I've made a little wallet album to house my ATCs.

Here is how I made the wallet using this Masterboard:
And here is my project for the challenge:
I've made a little wallet album to house my ATCs.
Here is how I made the wallet using this Masterboard:

Basically the same technique used for the ATCs which you can find HERE just different colours. Using that favourite stencil again to create the Bokeh effect.

Cut up the pieces to the size you want them and some chipboard to strengthen the structure.

This piece of Craft card will have the sections attached to it.

And so to the construction.
I've positioned the black card under the craft card. The craft card is just a little narrower than the black chipboard.

Here you can see I've turned it over and you are able to see the positioning. The areas where the craft card is still showing will be where the folds are made.
I've cut the Masterboard to size and started grunging the edges with a pair of scissors but you can also use a distressing tool or leave them smooth.
Construction is next so started attaching the pieces. If you intend using a magnet for the fastening, now is the time to add it but you could also add ribbon or cord under the card before attaching it.


Then decided they needed edging so added some faux stitch detail. You could do this before it's attached to the background or after as I have done here.


Next we need embellishments and a sentiment.

Get out the old punches and handmade paper! Still find these useful occasionally.

A little play around with the pieces and an embellishment by Tim Holtz,

then attach them.


Folders for the inside are next.

I used light weight black card for this and the Tim Holtz Pocket Envelope die.

Cut off the flaps as you don't need these.

Then close.

I prefer to use wet Glue to join all the pockets together.

I know people have different ways of doing this part but I find this works fine.

Paper clips ensure that they are all glued firmly together.

Then attach the first pocket to the front and last pocket to the back.

Paper clips again ensure that everything is secure.

And there you have it completed and ready to put the ATCs inside.

Side View.

Back View.

And from the top.
I do have more detailed instructions for this wallet from 2018 if you would like to see it you can find it here:
I hope you will pop over to see what the rest of the DT have been up to and maybe join in the challenge.
I look forward to seeing what you come up with too.
Happy crafty card making.
Angela x
I would like to enter this project in the following challenges:
Papercraft Challenges: challenge 39 - No Cards.
Shopping Our Stash weekly Challenge blog: 397 - Stencil me This.
A Place to Start: June challenge - Stencil me In - Use your Favourite Stencil.
Craft Stamper Magazine - Take it, Make It challenge - June.
Mini Album Makers Challenge - June Challenge.
This is fantastic.
ReplyDeleteGreat box, Angela, sorry really late this week, loved seeing all the stages an dwetn over to the other posts too, very clever idea.
ReplyDeleteHappy VERY belated WOYWW. Thanks for sharing, Shaz in Oz.x #22
{Wonderful Words of Life - Shaz in Oz}
{Calligraphy Cards - Shaz in Oz}
Angela this looks amazing, and what a fab tutorial! Have a very happy week, Sue xx
ReplyDeleteStunning and such a great tutorial as well. Love the stencil you used and the effect. Thanks for joining us at A Place to Start this month.
ReplyDeleteScarlett xoxo
love that gorgeous bokeh background, and you've made it into such an incredible "engineered" card with that cool fancy fold! thanks for SHOPPING YOUR (stencil!) STASH with us this fortnight!
ReplyDeleteThis is just amazing Angela. I love the Bokeh technique, great minds obviously think alike :o)
ReplyDeleteThanks for always stopping by.
Hugs Kimx
Your ATC Wallet looks so fabulous Angela! I love the masterboard used and the design and construction are amazing! Will have to bookmark this for future reference! Thanks for sharing the instructions! Have a great day! hugs xx
ReplyDeleteWhat a fabulous little project. Thank you for playing along with the Craft Stamper challenge xx
ReplyDeleteSo enjoyed reading the post Angela and thank you for the tips along the way. What a creative make and so unique and artsy x.
ReplyDeleteSo much has gone into this creation. The masterboard with the Bokeh effect is truly stunning and such soft colour tones. Such fantastic detailing from the stencil. The step by step detail is a joy to watch. Thank you so much for sharing with us at 'a place to start' Tina Chianna DT
ReplyDeleteThis is a fab little invention Angela and so nice to see your technique brought back again. Doesn't it sit proud to hold all those ATC's in one place. So smart in design and I just love those faux stitchy bits. Thank you for sharing.
ReplyDeleteHugs Tracey xx
P.S Sorry i've not been around, Mom's been ill & we've had visitors over the past week so no time for me!! Hope to catch up @ WoywW all being well x
Wonderful tutorial Angela and a great way to hold ATC's. Loving the masterboard colours.
ReplyDeletehugs
Glenda
Very nicely crafted! I have those border stamps, just couldn't resist them. Thanks for giving me a new idea for how I may use them. Wonderful project and beautifully executed. Thanks for sharing with us at A Place To Start.
ReplyDeleteHugz,
Chana Malkah, Owner/Designer
A Place To Start Challenge Blog
613 Avenue Create Challenge Blog
My FAVORITE thing in papercrafting is circles! I love your use of them - especially the addition of the ones you used as embellishments! I never know what to do with ATC cards; your thoughtful presentation will keep them safe and secure for years to come!
ReplyDeleteAngela, your masterboard, as always, is beautiful, I love that Bokeh effect. This is such a clever little album, I love how you used the Kraft card for the hinges, I must try and remember that idea! Thanks for sharing such a comprehensive tutorial.
ReplyDeleteI know I am late but whilst I am here, thanks so much for joining in with us at Mini Album Makers this month with your lovely album! Hugs, Anne xx
Morning Angela, had to pop back over and say Thank you for sharing this clever little album with us over at Mini Album Makers, so happy to see it amongst the board today. A Fabulous creation!
ReplyDeleteBest wishes with the challenge & Happy Sunday Hugs Tracey xx
great work!Thanks for joining us at papercraft-challenges.
ReplyDeleteA lovely project. I always think the best projects are practical as well as beautiful xx
ReplyDelete