Showing posts with label Art Shrines. Show all posts

Wednesday, 14 September 2016

WOYWW 380 # What's On Your Workdesk Wednesday.

Welcome to all my new followers, hope you enjoy the journey.

Hi Workdesk friends. 
Here we are for another Wednesday at the Workdesk. 
I am here again to show you:

"What's on my Workdesk this Wednesday".

If you don't know what this is all about then please visit the
 
Stamping Ground, our host Julia will explain.


So here is my desk for today!


My storage box is filling up again, just as well it has something to lean on Lol!
A few new dies and stamps on the left near that storage box and some wonky dies to the right.  
In the centre of the desk is a stamp I am just about to play with and if that's not enough here is a photograph of the new shrine. 
I know some of you were hoping to see this so here it is. I call it Alice meets Steampunk/Gothic. 
If you would like to see more photos and details of how I made this click here. 


So that's me done for today.

 Thank you for stopping by and hope you will pop over and join in the visits around the other desks.

 I'm off now to see what everyone else is up to.
Have a great woyww 
and 
happy crafting,

Angela x

Monday, 12 September 2016

Masterboard Monday. (a lttle bit at least!)

Welcome to all my new followers, hope you enjoy the journey.
Time for another Shrine and a little Masterboard!

How to decorate this shrines?
They are such works of art in themselves so I am always eager to do justice to them. I have to say this project just kind of evolved as I worked on it.
None the less after much stopping and starting!!! this is where I ended up.


I have to warn you this is photo heavy but there was a lot went into it.

Although I knew what I wanted to do with this piece it has taken me some time to complete it but it's here at last.
Some of you will be pleased as I know you have been waiting for this shrine. It's a bit Alice meets Steampunk/Gothic.


So here are the stages in making and this is the shrine I chose to use.
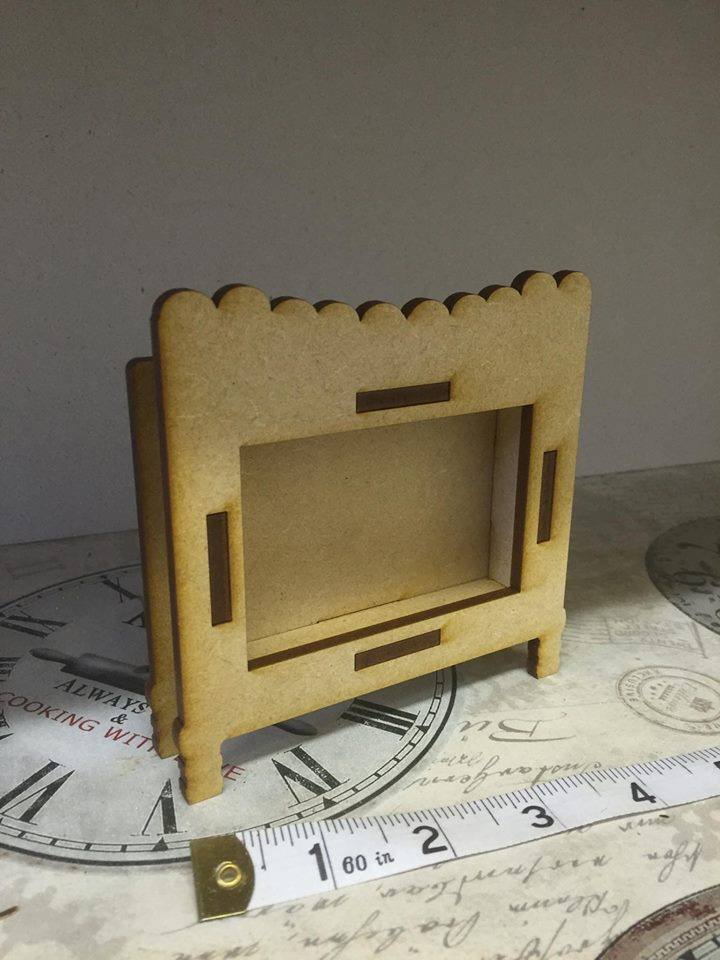
They arrive flat like this but no worry because they fit together really well.

I got this from That Craft Place and you can find them here and here.


And these: just happened to be hanging around.


 Oh! and this: more left over Masterboard! Which may give you a clue as to where this is going. I used a small section of this inside the shrine.


 So I started here.


Then attached the buttons.


Glue first.


Then add the buttons and more glue.


Paint next, Gesso first to seal the plastic buttons and when it's dry start to add the colour. I like to put a fairly thin coat of Gesso on first and then add a second coat if needed but it really depends on what type of paint you are adding over the top.

Front


 Back.


I also drilled some small holes at the top and sides.


And so to the paint. I used Prima rusting paint by Finnabair.


Gradually build this up and finished it off with various colours of Treasure Gold.


The jar of buttons became the bark texture for the rabbit hole surrounded by leaves which I made with paper clay and moulds.
The playing cards were made with Shrink plastic which had been stamped with Woodware playing card stamps.


 Cut the masterboard to size and die cut.


From here I added the embellishments.
These are the stamped playing cards all shrunk to size ready to be wired and Alice's arms painted and ready to go. You can just see in the top right corner the little metal pieces I used.


 When I look at it now I wonder why it took so long to make as everything fits together really well and seems so obvious but at the time of making I just wasn't sure how I would make the images I wanted so rather than rush it I did a bit and then left it for a while allowing time to work out the next stages.

And here it is, hope you like it.
Obviously Alice is trying to get out of the hole but you can only see her arms!
I threaded some of the playing cards onto thin wire and attached them using the holes I had drilled earlier and the rest were attached using my glue gun.

FRONT


SIDES


BACK


So that's it all finished.
I would love to hear your comments.
 Many thanks for stopping by and happy crafting,

Angela x

I would like to enter this in the following challenges:
1.Rhedd's Creative Spirit: September Challenge.
2.The Mixed Media Monthly Challenge 28 - Rustic.
I think my shrine looks pretty rusty! but what do you think?
3. SanDee and amelie's Steampunk Challenges: September Anything Goes: Steampunk/Industrial

Was it a dream or did it really happen? Only the white rabbit knows Lol!
5. Craft Stamper Magazine: September Challenge: 'Take a Stamp'-Anything goes


Saturday, 28 May 2016

That Craft Place Shrine Project.

Welcome to all my new followers, hope you enjoy the journey.

Back today to show you how I've been using those gorgeous shrines I showed you last week. If you missed them you can see them here.

So which one to work on first ???
Well this is what I made.


I kept looking at this one and the  top kind of reminded me of waves!
 
 
So that's were I started.
The shrines arrive like this: flat.
 
 
You could put them together before starting but I chose to paint them with Gesso first as the edges where going to be painted.
You need to try and avoid too much paint round the tabs or it can be difficult to push them in.
 
 
Next stage to paint the edges. I used a mixture of these two paints as I wanted the colour to match the papers I had planned to use.
 
 
Graphic 45 Beneath the Sea collection!
 
I used the smaller size which fitted better with this shrine.
 
 
Once the paint was dry, I attached the background papers and started to put the shrine together.


If you want a nice neat edge just sand gently which will remove any excess paper.
 

Glazing and dewdrops gave the watery effect.


I used some Sizzix dies to create the seaweed.
 
 
I also found some little plastic shells threaded together with cord and painted those with alcohol ink.
You can see them just at the bottom left.
 
 
Edges next.
These papers are perfect for this.


And the finished Shrine.
They are a bit like a small shadow box.
 
The Front.


And the Back.


I used one of the pockets and tags for the back and more Dew Drops, then finished the whole thing off by splattering on White pebeo Artist Marker. They are so juicy that you can tap them on your hand and the colour just splatters onto your work. They come in different sizes too and other colours.

If you like the Shrines, they are available here at That Craft Place.

Hope you enjoyed the visit.
 
Happy crafting,
Angela xXx

I would like to enter this in the following challenges:
That's Crafty Challenge Blog: The Sea Challenge
Mixed Media Place Challenges: May Challenge-Be a Light Mood Board.
This mood board so reminded me of the shining sea and the colour scheme was perfect so just had to enter my little shrine.


Moo Mania and More: Water

Monday, 23 May 2016

That Craft Place Shrine Project.

Welcome to all my new followers, hope you enjoy the journey.

Recently I received some new shrines form That Craft Place.
How gorgeous are they!!!!!


 Back soon to show you what I've done with them but which to start with??????

Big hugs,
Angela xXx

Blogs I follow

01 09 10