Showing posts with label Crafty Individuals. Show all posts

Monday, 22 September 2025

Masterboard "Use it or lose it" Monday.

       Welcome to all my new followers, hope you enjoy the journey.

I am here today to show you a card made with this Masterboard:


Or actually copies of this original (Made with an Altenew stencil).


Scan the original and then you can alter the colour, I use Picasa for this and it's great fun seeing what you end up with.
I did get a bit carried away I think!


This card was made using a small piece of one colour as the background to the diecut fish die (Memory Box).


Attach the background behind the die cut image and stamp the sentiment (Free stamp by Crafty Individuals from a magazine) be sure it's dry and then emboss the netting (3D embossing folder by Spellbinders). I went over the net very gently with blue ink to help it stand out a little more.


I used a brown sheet of the paper to layer the finished design and finished with dots of blue Stickles Glitter glue and that's it.

Clean and Simple? maybe!

I would love to hear your comments.

Many thanks for stopping by and happy crafting,

Angela x

Saturday, 7 June 2014

Stamping Board.

Hi beautiful Bloggy friends, on Saturday this week we went to the Patchings Art Festival near Nottingham.
It is fantastic to see so many people loving their art.
I met two lovely ladies from Ampersand who were demonstrating
Stampbord.
Stampbord is one of those things that seems to go in and out of fashion with crafters and artists but has always been one of my favourite surfaces to stamp on.
So I have decided it's time to get it out again and experiment a little.

These are some of the things I have done in the past.


The stamps on this project are by Paper Artsy and were used to make this box card.


I also like to use the shapes as embellishments on card, often making them part of a larger image as seen below.


You may well have seen this before as I posted it some time ago.
The whole of the cover to this accordion journal was made with the Stampbord.
This particular project also has cut-out shapes, glitter and beads set into the UTEE to give texture to the finished piece.

 
The simplest way to use Stampbord (that I have found), is to colour it with ink, paint or Pan Pastels, then stamp onto it using a waterproof ink, such as Versafine, Archival or Stazon and then when dry, go over it with embossing ink and apply clear embossing powder.


This is the effect that you will get by using the method explained but it's not the only way to use them and I will be back soon with more ideas and techniques.

 
Happy Crafting,
 
Angela x

Saturday, 20 July 2013

Instructions for making.

Hi Blogguys and girls here are the instructions for making the Stampotique card.

As always there will be lots of layers so sorry but it's the law 
according to Felix the Crafty Cat!

Equipment needed to produce the Masterboard.

 
Lots of layers there then lol! Again!

 
Draw the pattern for making the house and cut out in stiff card. I like the stuff you find at the back of some envelopes.
Corrugated card for the roof, lovely! Such a great texture.
Then cut the Masterboard, yes I know it's sad but you can make two or copy it.

 
Next stamp several copies of the Stampotique girls and cat on white and sprayed paper.
Tim Holtz cobweb on tissue paper.


Prepare the border and roof canopy. I used the Face Art stamp from Studio 490 using just the top section.


Pour the Utee onto the heat proof mat and stamp into it, wait for it to cool and then remove the stamp. I applied metallic rub-ons. I attached this to the paper with Hi Tack glue.

 
The walls were stamped with Crafty Individual crackle stamp ( I must use this so much!), on card that had already been sprayed.
Then emboss with Tim Holtz embossing folder.
More colour can be added to enhance the effect.
 
 
Now it's time to construct.
Further detail added in the form of smoke and fencing.
Emphasise the faces with 3D Crystal Lacquer and Stickles.
The label was computer generated.
 
 
The cat's wings were fusible film, stamped with a wing stamp.The moon was made using friendly plastic and a push mould and enhanced with metallic rub-ons. And there you have it.


 Angela x


Sunday, 14 July 2013

Artist Trading Cards

Hi Bloghoppers hope you have had a nice day today.
Just wanted to show you one of my favourite ATCs.
They seem to have gone out of fashion a little recently but I still love making them and continue to swap.
They also make great toppers for cards.


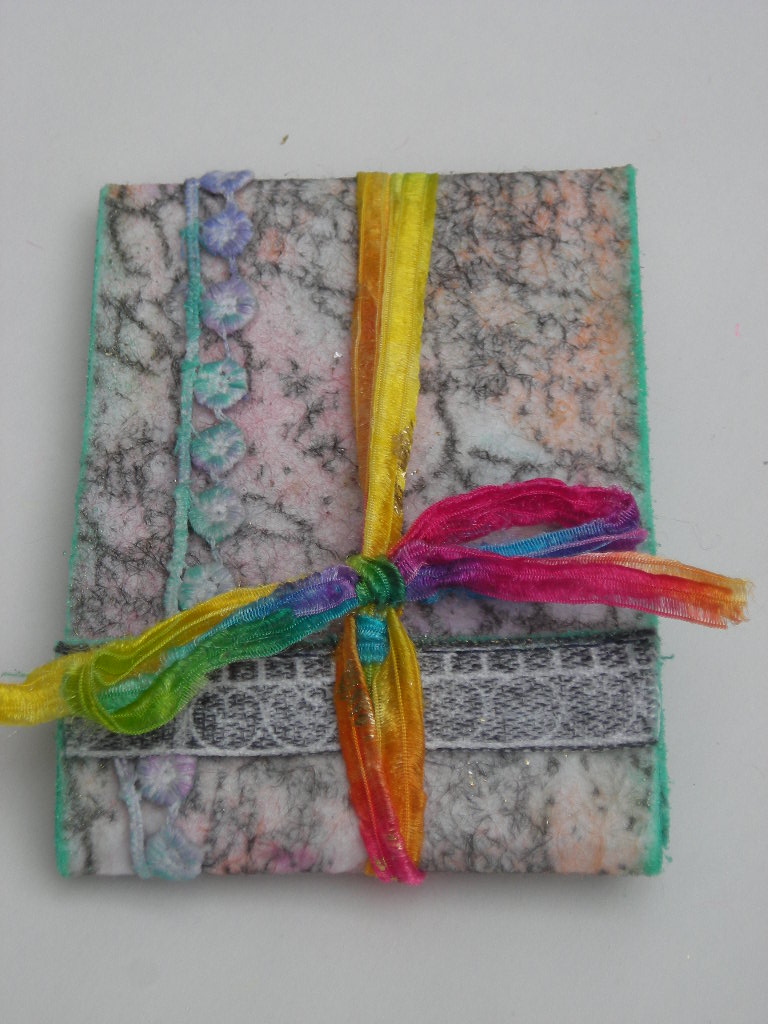
This ATC is a little bit different to my usual type, in that it is stamped on silk for the ATC and felt for the cover.
The stamps used are by Crafty Individuals and the inks are Fabrico (It is best to heat set these) and Perfect Medium.
You will also need a clear embossing powder.


To create the background on the silk I wanted a resist which I made by using the crackle stamp and Perfect Medium. I applied the embossing powder and heated this.
I used a variety of colours on the background and then sandwiched it between two sheets of newsprint and ironed it to remove the embossing.
I then stamped again with the crackle stamp and the thistle in black.
The button was also a Crafty Individuals date stamp.

 
For the felt, I also used the crackle stamp after applying colour to the background. A length of ribbon was used with the border stamp. Ribbon and lace completed the design.

Hope you like it.
Angela xxx

Tuesday, 9 July 2013

Acetate and Utee.

Hi Blogmasters thought you might like this technique.
I made this card for my father's birthday using an old photograph which I scanned and then printed onto acetate.
(Sorry about the reflection but it was difficult to avoid).
I used an antique style paper behind the acetate for added interest.
The brown background paper was stamped with a Crafty Individuals clock stamp, embossed with a Tim Holtz embossing folder and then rubbed over with Tea dye distress ink.

 
The frame was created using corrugated card and the Tim Holtz Vintage Cabinet Card Die.
The frame was then covered with Utee and stamped with the Crafty Individual Clock stamp.
Before mounting I coloured a metal frame with alcohol ink and finished this with a stamped tag.
The metal embellishments and ribbon completed the card.
I finished the inside of the card by stamping onto a separate paper and cutting the shape using the cabinet card die and attaching this to the inside of the card.

Hope you will let me know if you like this.

Best wishes Angela x

I am entering this for Here Come the Boys Sunday challenge starting 14th July.

Sunday, 30 June 2013

I love Star Books!!!

Hi Bloggers steady does it! We will get there in the end.

This is the first Star Book I made and there have been others since which I will post at some time in the future.


The stamps used for this were Non Secuitur Alice there are two sets used got these from The Stamp Man (Ask Alice and Scrabble and other Whimseys are the names of the sets). 


There are a few other stamps used.
The background behind Alice was completed with a brayer and Lavinia stamps.

Once again I had to use one of my favourite stamps which is the crackle stamp from Crafty Individuals. It doesn't show up so well on here but the background is really nice and very delicate.

             I love tags, pockets and things that hide.
I could not resist adding some Utee effects, so stamped into melted Utee with the sun stamp.

Couldn't resist making the door open as it fits so well with the story and the tag moves to reveal a message.
I used my own ideas for the construction of the pages and I know that people have different ideas about how to make these. My pages use four sections to complete them but if you look closely you can see that I have stamped inside these pages and there is definitely room in there for more detail which I have utilised in later samples of these books. You will have to wait and see!
Wouldn't this look great using the Steampunk papers from Graphics 45?
Must go have to get started on that one!
I might need more stash ali!

Friday, 28 June 2013

Ali-Craft blog challenge.

 
All the stamps used for this piece are from Crafty Individuals.
I stamped onto EcoArtBoard to create the front sections by layering Utee and adding various glitters while the embossing powder was still hot then stamping the clock stamp (tick tock).
I then used a smaller ArtBoard over the top with the travel stamps.
I am hoping to enter this in the Ali-Craft Open Blog Challenge.


For the background on the inside, I used the crackle stamp by Crafty Individuals and added gilding flakes.
The buildings were stamped over this and also onto a background paper then cut out and placed randomly to the main border.


 Black card was used for the back and stamped with date stamps using perfect medium stamp pad and perfect pearls.

 
Stamped tags, tickets, shrink plastic, butterfly elements and pearl swirls were added, the ribbon and beads completed the journal.

                Happy crafting,
                 Back soon,
                   Angela x
Blogs I follow

01 09 10
