Sometimes I just like to mix things up a bit and when I do you'll find the results here.
MDF Assemblage Projects.
MDF Violin by Hobbilicious.
I decided it was time I got the violin out of it's bag!
The papers come as part of the kit too.
There are a lot of parts to this kit but Hobbilicious are very good and make videos to help you put the bits together.
These two pieces are left over as they hold all the joining pieces but I'm sure they will not end up in the bin.
These are all the bits that fit at the end of the Neck (Scroll).
This is part of the embellishment set but there are lots more that you will see later.
So I've started by joining the side pieces for the base and top which will secure the two pieces together.
It's
important with MDF to make sure the holes which are needed to hold the
pegs are in the correct place so I've checked regularly as the glue
dried that these pieces will still fit. I know this well from
experience!
While waiting for the body to set I've put all the pieces together for thre scroll.
I'm going to leave you at that but will show you the next steps soon.
And here we are:
It's time to start putting everything together.
These side pieces will conect the top and bottom body sections
and it looks like this.
If
you plan to leave the sides open you would have decortated the inside
before adding these side and top pieces but that's not my plan.
I'm
putting the Scroll and the Fingerboard together while I wait for the
main section to dry. This is not a project that can be rushed.
The
next part is to attach the sides usually known as the Rib. I've used
some card from old postage envelopes, 'waste not want not' as they say.
My
tip for adding card to a curved surface like this is to roll it around a
rolling pin or something similar before attaching it.
You can see here how the Chin rest and the Tailpiece will fit in place.
From
there I've started decorating the sides which I wanted to be textured
so I've used some screwed up tissue paper which was actually the
wrapping for the kit so more chance to use it rather than lose it. Gel
medium is best for attaching this.
All ready for the next stage.
These little pieces are the pegs.
Which fit into the Scroll and hold the strings. I think that's enough for today and hope to have got a bit further by next week fingers crossed!
Next added some Steampunk style paper to the front.

A little play around with some of the embellishments next.
And glued the back ready to cover that too. I'm using a light Gel medium for the gluing.
Then use a file to gently rub away the excess card.
And it will look like this and then it's time to start moulding and painting the embellishments.

I did not paint the tentacles before adding them to the sides of the violin as it didn't seem necessary but you could do.


These look even better in real life, painted with a stencil brush and then gilding flakes added to a few pieces.

I'm still not finished here but just trying to decide where I want everything to go. I like to plan and photograph my ideas as I can never get it the same twise.
I've also started adding wax to the embellishments on the side too. 
And some ideas for the back too.
All finished at last.

A dry brush was applied with white paint to lighten the embellishments.
I've also added a few coloured gems too.
Just have to decide what's next!
ooo0ooo
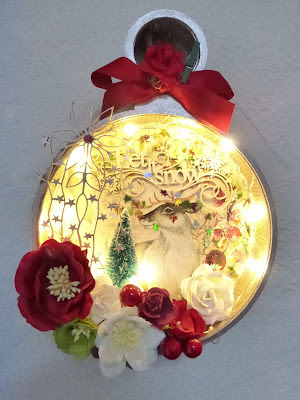
Light up your Christmas.
ooo0ooo
'Her Secret Wish'
Project by the Creative Craft Academy. Details for this project can be found here:
'Gothic Cabinet' by Hobbilicious.
Just a few photographs of the stages in making.
The set arrives with clear instructions which is good.
And it's easy to put together.
I finished the top but didn't glue it in as it's easier to work inside the section unless you have very tiny hands.
After attaching the side pieces I wrapped some cord around the bottom of the roof to keep it in place while it dried.
And it looks like this.
To get the grey board to curve nicely I roll it around a tube first so that it's the correct shape rather than flat.
And so it's time to add the detail.
There was time while everything was drying to do some moulding.
And then start attaching everything.
If you look closely you will see that I have stenciled the background before adding the moulded pieces and added a layer of Gesso too. That was a stencil by Finnabair.
Dragon piece by Prosvet.
A few little gems added and I've added some decorative paper to the back wall.
My idea here was to build up a little story across the back section but you will have to use your own imagination here as to what it's about.
Lot's of paint next.
Front.
Back and the drawer sections.
Then the colour with acrylic paint and a dry brush.
And the finished project.
With a few of the treasures from my collection of dragons and Quartz crystal wands which just seemed to suit it and the sweet little pocket watch.
I'm going to keep quite now so that you can just enjoy looking.
Happy creating my friendsHugs, Angela xXx
Creative Craft Academy projects.


.JPG)


.jpeg)

.jpg)


No comments:
Post a Comment