Showing posts with label Aall and create dies. Show all posts

Wednesday, 28 May 2025

WOYWW - 834 - What's On Your Workdesk Wednesday.

     Welcome to all my new followers, hope you enjoy the journey.

Hi Workdesk friends. 
We are here for another Wednesday at the Workdesk and here is:
"What's on my Workdesk this Wednesday".


If you don't know what this is all about then please visit
 Sarah's Craft Shed and our host Sarah will explain.

So here is my desk for today!


This was last week but thought you'd like to see what I did with some of it.

If you were around Monday you will have already seen it.

Today actually looks like this:


Quiet really but there is a reason.
I will be out today as we're going to a funeral but I'll get round everyone hopefully when we get back but that could be late as we've some distance to go.


A lovely card and ATC, thanks to LLJan and Julia.


Also on my desk today are these washi tapes. How gorgeous are they!
Not a clue yet what I'll do with them but couldn't resist them so here they are.


Some very old butterfly stickers that keep turning up and some stencil paste.


This border was the remains of the pieces cut out for the card above so I've attached it to a piece of card but so far nothing else, got brain fog now Lol!


So that's me done for today.

 Thanks for stopping by and hope you will pop over and join in the visits around the other desks.

 I'm off now to see what everyone else is up to.
Have a great woyww 

and 
happy crafting,

Angela x

Monday, 12 May 2025

Masterboard Monday Use it or Lose it.

   Welcome to all my new followers, hope you enjoy the journey.

I am here today to show you a card made with this Masterboard:
Well! another one actually.


If you remember last week's Masterboard design then you will recognise the background to this card.
This is a small left over piece that I've cut up using a AALL and Create die.
The bird and the sentiment are by Kate Crane.


A feaw blobs of Stickles Glitter glue to finish it off and we're all done.
Hope you like it.

I would love to hear your comments.

Many thanks for stopping by and happy crafting,

Angela x

Wednesday, 18 September 2024

woyww - 798 - What's On your Workdesk Wednesday.

   Welcome to all my new followers, hope you enjoy the journey.


Hi Workdesk friends. 
We are here for another Wednesday at the Workdesk and here is:
"What's on my Workdesk this Wednesday".


If you don't know what this is all about then please visit
 Sarah's Craft Shed and our host Sarah will explain.

So here is my desk for today!


I seem to have been distracted by gardening this week but promised to help a friend to do some samples for the Craft Club and this is as far as I've got so need to get a move on.


New die on the left but not tried it out yet.

I have done a bit more on the Diorama but it's not finished yet, I'm up to decorating the top......when I have time to continue with it.


Very clean release from the plastic tub.
Just added a few more details.

Click the arrow to see more.


Hope this works to give you a better view of the Diorama but next week should be better still.

So that's me done for today.

 Thanks for stopping by and hope you will pop over and join in the visits around the other desks.

 I'm off now to see what everyone else is up to.
Have a great woyww 

and 
happy crafting,

Angela x

Monday, 15 July 2024

Masterboard Monday.

 Welcome to all my new followers, hope you enjoy the journey.

I am here today to show you a card made with this Masterboard:


A Retiform Masterboard this week, I've not used this technique for a while so thought it was time for it to show it's face again.
I made this on A3 card with lots of Lavinia stencils and Tim Holtz Distress Oxide Inks.


I like to use sticky notes to mask off the lines as I add the inked edges.


This is just the beginning. 
I like to start in one direction going up and down and then left to right, to create the pattern.


From there I added the stencil designs.


My tip for this would be to use one stencil at a time and move the design around so that you will finish with a good arrangement and not getting the same design too close together.


I'm showing you a close up here which gives a better view of how I arrange the stencils. I like to turn the card occasionally which also makes the design more interesting.


And here's the finished card.


The dies are AALL and Create, the fish are Kate Crane, sentiment by Spellbinders and the crab is by Studio Light.
I finished this off with Stickles glitter glue and added Glossy accents to the body of the crab.

Hope you like it.
I would love to hear your comments.

Many thanks for stopping by and happy crafting,

Angela x

Wednesday, 24 January 2024

WOYWW - 764 - What's On your Workdesk Wednesday.

 Welcome to all my new followers, hope you enjoy the journey.


Hi Workdesk friends. 
We are here for another Wednesday at the Workdesk and here is:
"What's on my Workdesk this Wednesday".


If you don't know what this is all about then please visit the
 
Stamping Ground, our host Julia will explain.


So here is my desk for today!


Not much to show you other than some new stuff which only arrived yesterday. 
I seem to have found other things to occupy my time.


Some new AALL and Create dies and some hot foil plates. The card on the left is AALL and Create stamps and is waiting to be completed, might try adding some foiling to it but we'll see.
Under the card is my technique journal that I'm using for my collage projects. You'll get to see more of that in time.

So nothing really very exciting but if you need some ideas for Valentine cards I have some on the post below this one here, they are old ones from last year.

So that's me done for today.

 Thanks for stopping by and hope you will pop over and join in the visits around the other desks.

 I'm off now to see what everyone else is up to.
Have a great woyww 
and 
happy crafting,


Angela x

Monday, 13 June 2022

Masterboard Monday Use it or Lose it.

  Welcome to all my new followers, hope you enjoy the journey.

I am here today to show you a card made with this Masterboard:


I hadn't really planned to do anything else with this but there's still some left and every little piece can make great cards.
So today I'm showing you how to make a card with those left-over pieces.

All the stamps and dies I've used here are by AALL and Create.


This is one of my favourite ways to make a card when ever I need something quick or I'm stuck for an idea so always have a few masterboards made in advance.

To make this card first cut the masterboard to the size you need for your chosen card then into three pieces, (three always works better than two but any odd number is good) layer them with coloured card and you're ready to mount them however you wish.
I distressed the edges of my three pieces before layering them but you can prep them anyway you wish.

So don't forget to use those left-over pieces.

I would love to hear your comments and
many thanks for stopping by. 

Happy crafting.

Angela x

Addendum: Even numbers create symmetry while odd numbers create interest. An odd number of details is more effective at capturing your gaze. Odd numbers force your eyes to move around the grouping as there is a sense of disorder whereas even numbers give order and comfort. That forced movement is the heart of visual interest.


Monday, 7 February 2022

Masterboard Monday

  Welcome to all my new followers, hope you enjoy the journey.

I am here today to show you a project made with this Masterboard:


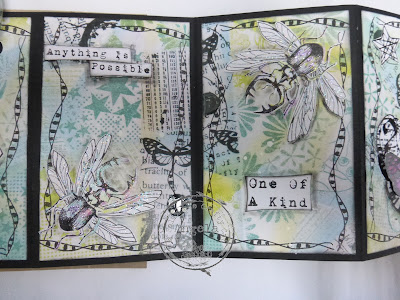
If you think the Masterboard looks familiar then you would be right. I scanned it and printed it off again for this project.


I've used a laser printer with this and it looks just as good as the original.
Stamps and stencils are by AAll and Create.


This is the front of the concertina book. 
I glazed the stars which is why they may look a bit shiny.


I made a new background sheet for the stars just by applying Oxide ink with a blending tool and applied some water drips to lift off some of the colour.


Once dry, I stamped and heat embossed the stars.


I couldn't initially decide about the back but chose to use the star stencil with some white ink. More on this to follow.


And this is where I ended up.


I can't apologise but there are lots of photographs here so pleased be prepared for a rather long post!

Front.
As you can see this is a concertina book.


Back.
 Which I like as much as the front and is giving me an idea for another project.


The cover is Kraft card and black Oxide ink through the star stencil.


There was already lots of detail on the masterboard so I tried to keep the embellishments simple.......yes I'm kidding myself Lol!


The sentiments are by AALL and Create too.


A few close-ups.

Several different stamp sets but they all work so well together.


I love the edging stamp and use it lots.


If you are familiar with these stamps you will know that I have trimmed and rearrange some of the parts of the images.


I couldn't decide how I wanted to close this book so I only attached part of the front to the Kraft card so that about one third was left loose and this became the closure.


This allows the back of the folder to be tucked into the opening and I'm pleased to report that it stays there nice and flat.

I certainly enjoyed the process though it was a long one.
I would love to hear your comments.

Many thanks for stopping by and happy crafting,

Angela x

Wednesday, 17 March 2021

WOYWW - 615 - What's On Your Workdesk Wednesday.

 Welcome to all my new followers, hope you enjoy the journey.

Hi Workdesk friends. 
Here we are for another Wednesday at the Workdesk. 
I am here again to show you:

"What's on my Workdesk this Wednesday".

If you don't know what this is all about then please visit the
 
Stamping Ground, our host Julia will explain.


So here is my desk for today!


The box on the left is some new Modelling Material for moulds. 
Not used it yet but it looks good.
I am working on the washi tape that I prepped last week.


I've been using some of these AALL and Create dies.


And I've cut some of the Washi tape. 
The paper below it is part of an earlier Masterboard.


I have collected together some other bits and pieces which looked useful.


These are on top of a large black tag and the red net is what my oranges came in. I always like to reuse stuff if possible and this looks rather good for this project.

Now time has not been on my side this week but I have made this quick card using some of the other Masterboard I showed you last week.

Quite like it and hope you do too.
So that's me done for today.

 Thanks for stopping by and hope you will pop over and join in the visits around the other desks.

 I'm off now to see what everyone else is up to.
Have a great woyww 
and 
happy crafting,


Angela x

Blogs I follow

01 09 10