Thursday 31 October 2013

The Adventures of BP MIni Me

Hi BP Mini Me here to wish you all a happy Halloween lol!
But who is this?

 
Where did you come from?
Hope he's friendly, he has a very large pecky beak lol!
Better hide behind my friend till I'm sure.
 
Back soon,
BP Mini Me x
 

Tuesday 29 October 2013

Plague Doctor

Hi Blogghooles, just wanted to show you what I have been up to.
I have been hoping to make a Plague Doctor mask ever since the Steampunk Festival and the challenge at SanDee and Amelie was the incentive I needed lol! so here goes.

Plague Doctor masks are usually made from leather which gives flexibility to the construction.
I decided to use Tim Holtz Grunge Paper which is also flexible and gives a similar appearance to the finished piece.
Although the starting point was the Plague Doctor mask I wanted to create something a bit different and add texture to the finished piece.
 
This is what I finally came up with.


I searched the Internet for ideas and there are many variations of these masks. 
 
This shows a close-up of the texture, metal sections and lettering.
I started by cutting the shapes out and covering them with black acrylic paint then running them through the cuttlebug using various embossing folders.
I then added gilding wax to the texture and letters to create a patina effect.
The pieces were joined together using glue and brads and the addition of a metal tag and plastic bottle cap finished off the eye sections.


                   Underside view.


This is the Photograph I took at the festival which prompted me to make the mask.


I am going to enter the mask in this months SanDee and Amelie's challenge which is Tick Tac Toe and I have chosen to use: Metal, Texture and Letters.
Time goes so quickly but just enough time to meet the deadline.
 
Hope you like my effort.
Back soon.
Angela x
 
P.S. People have been asking about the Plague doctor, the real ones were a bit gruesome, here is a little added information and there's lots more about them on Wikipedia.
 
Some plague doctors wore a special costume, although graphic sources show that plague doctors wore a variety of garments. The garments were invented by Charles de L'Orme in 1619; they were first used in Paris, but later spread to be used throughout Europe.[10] The protective suit consisted of a heavy fabric overcoat that was waxed, a mask with glass eye openings and a cone nose shaped like a beak to hold scented substances and straw.[11]
 
 
 Back soon Angela x

The Adventures of BP Mini Me

Hi again, BP here, been looking for good hiding places and I think I have found one.
See if you can spot me lol!

 
Good? There's no way she will find me now lol! Just hope there's no-one else hiding in here!!!
                       Back soon,
                       BP Mini Me.

Monday 28 October 2013

Masterboard Card Ideas

Hi Blogbeasties  almost the bewitching time and as I still have some paper left from the last Masterboard I decided to make another Halloween card, hope you like it?

 
This little chap just had to be in the photograph.

The accordion card uses the paper that I stamped with the Graphic 45 Steampunk Spells stamps from Ali-Craft and several Sizzix dies by Tim Holtz though the web is actually Cottage Cutz.
I also used a cuttlebug embossing folder for the background and went over this with gilding wax.
I finished the card off with brads and gems.


              Inside of the card.


Back of the card.


             Close-up of the images.


I have used some Tim Holtz Distress Crackle Paint to give the images a more distressed metalic look.


Hope you all have a great Halloween.
Craft On,
Angela x


Sunday 27 October 2013

The Adventures of BP Mini Me

Hi BP here, found another new friend and he's just my type, what a boy but don't seem to be able to get him to say much as yet, think there may be an on button somewhere, I will find it!
He's quite a handsome fellow, I could really take to him, nice doggie, lol!


Back soon when I find the button.
BP Mini Me.


Friday 25 October 2013

The Adventures of BP Mini Me

Hi BP Mini Me back, been keeping my head down for a bit,mind you the weather has been a bit nasty as you can see. I had hoped to venture outside but it will have to wait, still there are other adventures to be had inside.


I think I may have to look for good places to hide as I think they may be onto me.
Not sure but I think someone's being telling tales!!!
                        Back soon,
                        BP Mini Me.

Wednesday 23 October 2013

Masterboard Card ideas

Hi Blogsters  this may well be the last of the cards made with last weeks masterboard but the fact is, I still have some of the paper left so you never know lol!
Anyway here is today's offering.

 
I just love this spider lol!
 
 
This section is a close-up of the insert.
 
 
Even more Creepy Hugs.
Back soon, Angela x


Tuesday 22 October 2013

Masterboard Card Ideas


Hi Bloggers, these are the last of the samples from last weeks Masterboard.
Got a bit carried away with the papers but they seemed to go so far and I was enjoying making the cards.
Hope you like the samples.


I know the eyes are a bit crazy but that's the mood I was in when I made this one lol!
The spider and the label are Tim Holtz and the die cut web is Cottage Cutz.

 
Hope you like it . The final one will follow tomorrow.
 
Big Creepy Hugs,
Angela x
 

Monday 21 October 2013

Halloween Accordion Card

Hi Bloggyfriends  time for Halloween cards and just had to try out the accordion die by Karen Burniston, so here goes.
This is my contribution to the DT projects this month over at the Ali-Craft blog.
It felt a bit strange for me when making this card as it doesn't have any stamping on it but I can live with it for once Lol!

For this card I have used:
  • Graphic 45 Steampunk Spells Papers and Stickers from Ali-Craft.
  • Stiff Acetate.
  • Tim Holtz Cobweb Sizzlits decorative strip available from Country View Crafts.
  • Karen Burniston Accordion Flip 3D die from Country View Crafts.
  • Sizzix Sizzlits Bats die.
  • Tim Holtz spider from the Candlelight Fright Bigz die available from Country View Crafts.
  • Stickles Glue.
  • Gems.
  • Metal Brads.

This card may look complicated but is actually quite easy to make and there are instructions which come with the die.

Inside of the card.


Card Front.


 Back of the Card.

  • First die cut the chosen papers to create the front and back sections. I have used four sections but any number can be cut, it's your decision.
    I have also cut the same pieces in a plain card as I didn't feel that the patterned paper was stiff enough for this type of card.
   I know you are probably thinking this is a shame as the paper is double sided but that's life lol!
  • Next, attach the die cut paper sections to the card sections and join together to create the front.
  • Die cut the bats and attach to the acetate, these will need to be attached before the back is completed.
  • Attach the pattened paper to the back and position the stickers.
  • I did mat and layer some of the stickers before attaching them to the main sections and added metal brads.
  • Complete with ribbons, gems, cobwebs and Stickles.
Hope you liked the card and will nip over to Ali-Craft to see what else the DT members have been making this month.
Crafty Hugs.
Angela x


Saturday 19 October 2013

The Adventures of BP Mini Me

Oh, you're back we wondered where you were!
She's been looking for you!


I have been for a walk and made lots of new friends.
You really should come with me on my next adventure.
 
See you soon.
BP Mini Me x

Friday 18 October 2013

Masterboard Card Ideas

Hi Bloggies another Halloween card today made with the Monday Masterboard.
It's amazing really how much you can make from three A4 sheets of card.
Anyway here it is.


Those bats seem to get everywhere lol! but I do like them.
I have heat embossed the clock, this time with Frantage Shabby Green Embossing Enamel by Stampendous which has helped bring out the colour of the Masterboard and then mounted it with 3D foam tape.
 
 
Every time I use these stamps I am amazed at how clear the images are even when embossed.
 I finished the design by adding some black gems.

 
This gives a view of the insert.
 
Happy crafting,
Angela x


Thursday 17 October 2013

Masterboard Card Ideas

Hi Blogboosters  I have more ideas for using the Masterboards I posted on Monday.
I am using the Graphics 45 Steampunk Spells stamps again
(available from Ali-Craft) but have also included some Tim Holtz stamps and die-cut bats from Sizzix.
I heat embossed one of the bats to give added interest and the tag, to create a focal point for the card.
Hope you like it.


I wasn't sure about the background colours of this card but I think it works well with the black.
The tag and the barbed wire are Tim Holtz stamps.
More to follow tomorrow.
Craft On, Angela x


Tuesday 15 October 2013

The Adventures of BP Mini Me

Well it's been an interesting few weeks and I am finding my way around here.


What's that you say? you really will have to come closer,
I can't reach you from here.
This is the first time anyone has asked me for a kiss but I'm up for it if you are!!
BP Mini Me x
 

Monday 14 October 2013

Masterboard Monday

Hi Blogsters  back again with another masterboard.
As I need to get some Halloween cards made it seemed like a good idea to use the theme as a starting point.
I rather liked the masterboard I made the other week  using the Graphic 45 Steampunk Spells stamps from Ali-Craft and decided to make something similar using other colours.

       This is the original masterboard.

 
And one of the cards I made.
 
 
I decided to swap the colours around and use a black background and white ink.
Also used some card which had been sprayed with Crafty Notions Colour Sprays.
 
 
And here is the first of the cards I have made.
Couldn't resist my favourite technique of adding flying things lol!
In this case bats.
I cut these out using a Sizzix thin die and attached them to a strip of acetate.

 
These views should show the bats better.


Hope you like these and more samples to follow.
 
Crafty Hugs,
Angela x


Friday 11 October 2013

The Adventures of BP Mini Me

Anybody looking? don't think so!
BP Mini Me here again.


There are some very lazy creatures in this house,
now keep quite dog and say nothing or your girl friend gets it, whatever it is?
Not sure he's listening, hello dog, anybody in?
BP Mini Me, Dog Day x

Wednesday 9 October 2013

Journal Away Wednesday.

Hi Blogbuddies  has anyone seen a little robot wandering around? He seems to have gone missing lol! again!

Anyway, I just wanted to show you something I have been working on in my journal, it is the start of what will be a more detailed page.

 
I really like these light bulbs, the smaller ones were by Creative Expressions and the larger ones by The Artistic Stamper.
I am not sure yet how I will finish this and I may copy it and use the print for something else, so it may end up being used as a Masterboard! we will see how it goes.
Thanks to the clever person who invented the scanner, lol!
  • The yellow background was Mica sprays and distress ink, rubbed onto a craft mat and then swiped onto the pages.
  • When this was dry I stamped the light bulbs around the page and stamped the large bulbs more centrally.
  • The pattern on the large lightbulbs is actually on one of the stamps.
  • In some cases I masked the bulbs before stamping the others to give depth to the design.
  • The darker colour was added as a wash with a watercolour pencil and some of it was removed by blotting.
  • I have also added some highlights to the pattern on the large lightbulbs and parts of the smaller bulbs using a white pen.
The mica has actually made the page quite shiny, though it is difficult to see here.
 
More to come later.
Angela x


Tuesday 8 October 2013

Masterboard Monday

Hi Blogbuddies as promised, here is the finished binder that I made using the Masterboard shown on Monday, hope you like it .
 
 
The ribbon for the fastening was decorated with the same stamps as the binder.


I am entering the design on the front of the binder in
Steampunk challenge for October which is Tic Tac Toe.
I have chosen the Clock, Gears and Ribbon line for my design.


Back soon with more fun things,
Angela x

The Adventures of BP Mini Me

Hi BP Mini Me here,
They are out today so thought I would have another look around.


Stop looking at me dogs, how do you suppose they got in there?
I thought they were out with the other two.
Quite confused,
BP Mini Me!!!

Monday 7 October 2013

Mastrboard Monday

Hi  Blogsters  hope you are all good today.
I have been putting off doing this job as I just couldn't decide what to do, lol!

My friend and I had an envelope swap and we had got to the stage where we needed to produce a binder to put them in and could not decide what to do.
Well, I had a brain wave, strange I know, but there you are! and I have almost completed the binder so here is what I did.

Once I got the idea it was so simple and obvious that I couldn't understand why I hadn't thought of it before.
Because these are envelopes I wanted to be able to see the whole thing including the flap and sticking them down would have lost some of the detail, so here is what I came up with.

I started with this......

 
And I ended with this.

And this is what happened in between.
 

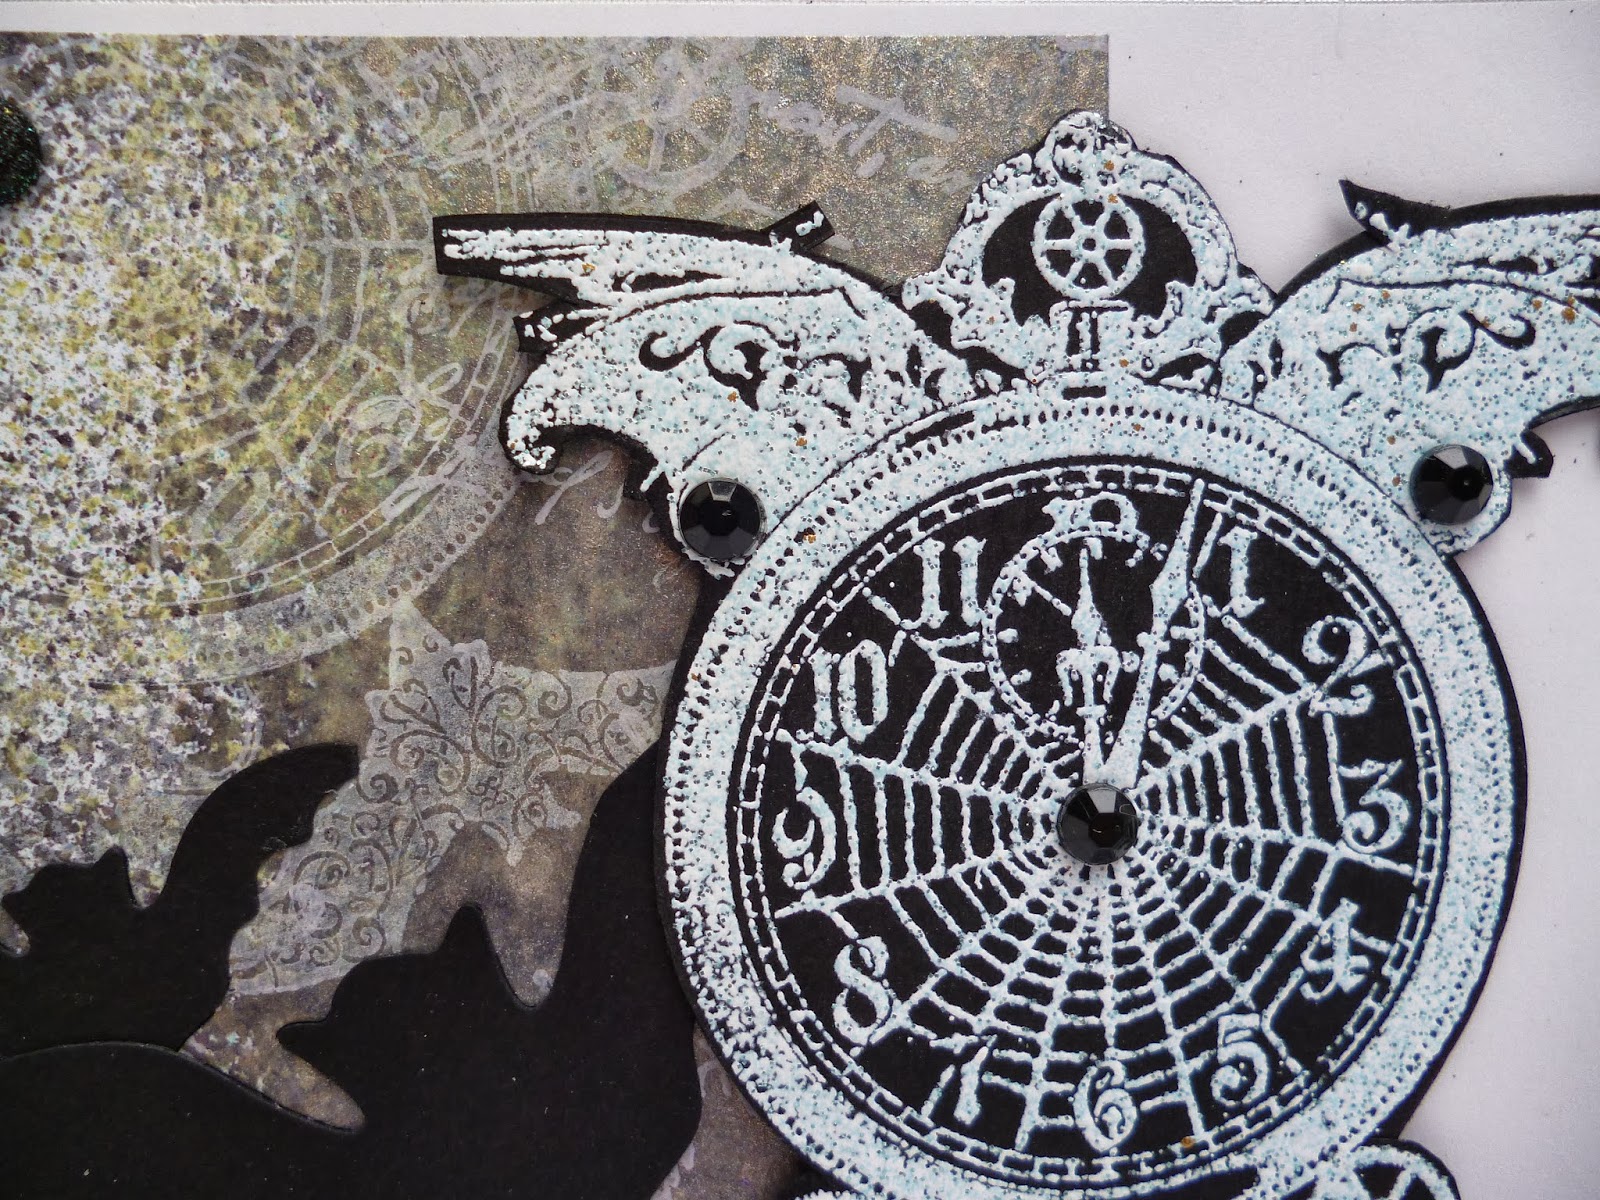
First I created the Masterboard using brown wrapping paper which I sprayed with Cosmic Shimmer Mists and then stamped with a crackle stamp.

 
Next I added the detail in the form of Tim Holtz splatter stamp and
Chocolate Baroque, Punky Romance using the clocks and gears stamps.
I heat embossed the clocks and gears with white WOW embossing powder and the splatter with cosmic shimmer, to add texture.

 
After checking that the envelopes would fit and that there was enough space for all of them, I scoured the folds.

 
I then cut a strip of card to fit the centre and wrapped enough strands of elastic round for the number of envelopes it would need to hold.
I glued this down and added masking tape to give a smooth finish.

 
I then took the masterboard and attached it to the back of the binder, turning it in to give a neat finish.

 
I used a plain piece of the sprayed paper to cover the inside.
The paper needs to be slipped carefully under the elastic before being stuck down.
 
And so we got to this though not quite complete as it needs a little extra to decorate the front which I hope to have completed before the end of the week so please call back if you can to see what happens to it.
 
 
Crafty Hugs,
Angela x

Related Posts Plugin for WordPress, Blogger...

Blogs I follow

01 09 10