Friday, 28 February 2014

Textured Tag.

Hi Bloggettes  hope you are all well and managing to keep warm.
I really enjoyed my visits around the desks on Wednesday and look forward to doing it again.
I have met some really interesting people with all kinds of crafty interests.
If you are unsure what I am talking about visit Julia at Stamping Ground to find out more.

However today is Friday and I am here to show you a tag I have been making.
I had this half made for some time and then noticed the challenge at Simon Says Monday Challenge and decided to finish it.

Here it is sitting patiently, waiting for someone to love it.

 
It has still taken me a few days to decide how to complete it but here it is at last.

This shows the goodies I used to make it.
The stencil is by VIVA decor and is called Ornament Background.
I think everything else is pretty obvious.

 
I had started the tag by gradually building up the colours, applying the ink with a blending tool, through the stencil and once covered I applied further detail with the stencil and the PaperArtsy Grunge Paste.
I allowed this to dry and then went over it with the Treasure Silver and Treasure Gold gilding wax (gorgeous lol!).
At this stage I still could not make my mind up what to do and added a die cut flower by Memory box using some bright pink satin card.
And that was it until this week!

 
First a peek at this bit!
 
 
And this bit.
 
I added some extra texture in the form of Kroma Crackle and Distress Crackle paint.
You may be able to see this on the close-ups.


And finally the completed tag.


After adding the flowers and ribbon, I finished it with the sentiment and a dragonfly.
 
I will be entering this in the Paste challenge at Simon Says Monday Challenge
 
Hope you like it.
Back soon,
Angela x


The Adventures of BP Mini Me.

Hi BP here, bet you wondered where I've been. Well, there have been loads of workmen around so I have had to keep my head down.
Anyway, I am back on the shelf and have found myself stuck here with this big head lol!


He has all sorts of stuff written up there, strange!
The wooden guys don't say much either.

Anyway I hope to go walkabout again soon as I think the workmen have gone, at least for the moment!

                         Back soon.
                        BP Mini Me.

Wednesday, 26 February 2014

What's on Your Workdesk Wednesday 247.

This is my first real go at Julia's WOYWW so I hope you will be gentle with me lol!
I shall do my best to visit you all and want to thank those who visited my blog despite my very late post last week.
So here goes nothing!

 First Spot The Difference.

1.


2.


Go on say it.
Where is the difference?
 
I have been very busy and the table  1.  had become so cluttered that I ran out of space so tidied it up 2.
 
Well it was tidy for a while lol!
 
Then I started my next Masterboard project and what do you know?
back to normal, Untidy! though maybe there is just a little more space than before.
 I don't think it will last long, I know you will understand.
That's the Life of a Crafter.

 
I haven't quite decided what to do with the papers yet so may have to tidy up again.
 
Back soon.
Angela x

Monday, 24 February 2014

Masterboard Monday

Hi Bloggsters it's time again for the next Masterboard.
I am about to start a masterboard swap project with my friend Gloria and this may be the one I send her but not decided yet.
I thought as spring is on it's way (yes, I know that's wishful thinking), we need something with pastel colours.
Hope you like it.

I used:
Big and Juicy, Gum Drops and Spice.
Marvy Blending Box, Shades of Yellow.
Dylusions Stamps, Around the Edge - DS006.
Graphic Backgrounds - DYR38344.
The Write Words - DYR40934.
Good quality A3 cartridge paper.

I started by dabbing the Shades of Yellow ink onto a craft mat and spraying it with water. Place the cartridge paper over the ink, lifting and turning until all the ink is removed.
It is important to allow the paper to dry between colours to stop it becoming saturated.
I continued to add the colours until the paper was covered.
Once the design is dry, I like to place it under several sheets of A3 paper to flatten it before starting the stamping.

 
I used the Big and Juicy Spice to stamp the detail.

 
This is quite a delicate design but should look good if layered with matching coloured card.
 
The next thing is to decide what to make with the paper.
 
Back soon with ideas.
Angela x


Friday, 21 February 2014

Steampunk Time Machine, Tim Holtz style.WOYWW246.

Hi Blogbuddies, here today to show you my Time Machine.
I realise that it is Friday not Wednesday but have only just got round to joining WOYWW so please forgive me.

I saw the Time Machine challenge on SanDee and Amelie's Steampunk Challenge blog and thought it would be fun to do.

I had been wondering what to do with this Tim Holtz die and when I saw this challenge I just knew it would be perfect for this project.

These are the materials I used to make the Time Machine.
It makes the desk look tidy but what you see is about the only available space that was left lol!


I also added a light for the inside of the box which I got from Lakelands.
 
 
And here is the SATT Box.
(Space and Time Travel Box)

 
I had this little guy and was just dieing to find a use for him.


I cut out the parts using a grey shiny satin card and embossed them using the  Tim Holtz embossing folder. I rubbed over these using a blending tool and purple and pink Brilliance ink.

I then cut out the large wing sections from the Fanciful Flight die and layered these then attached them to the roof section with a faux screw brad.

I used the sticky back Frosted Film to create the windows and rubbed over this with the green ink then attached the metal clock embellishment to the front.

I couldn't resist adding the robot pendant. He looks a bit like a Steampunk spaceman so it seemed like the perfect time to use him.

I placed the light source onto the base and placed the box over the top.

         Hope you like my SATT BOX.
            Back soon,
              Angela x

Masterboard Card Ideas, using the Gelli Plate.

Hi Bloggies, I have been using another of my Gelli plate efforts to make a greetings card using Memory Box dies, hope you like it.

The acrylic paint was Raspbery with a touch of Waterfall by ecogreen Crafts and they are gorgeous colours.
I printed this onto a kraft style card and you can still see some of the brown showing through.
The mask is the large Shattered by Dylusions.

 
To bring out the green in the print, I layered the design first onto a shiny satin pink and then onto green card.
The bird and the bubbles are both Memory Box dies.
I completed this by stamping the sentiments and tieiing a pink cord before layering the design and applying black brads to the corners.

 
The nice thing is that once you have these background papers it is not difficult to prepare a card when you need one.
 
Back soon,
Angela x
Tuesday, 18 February 2014

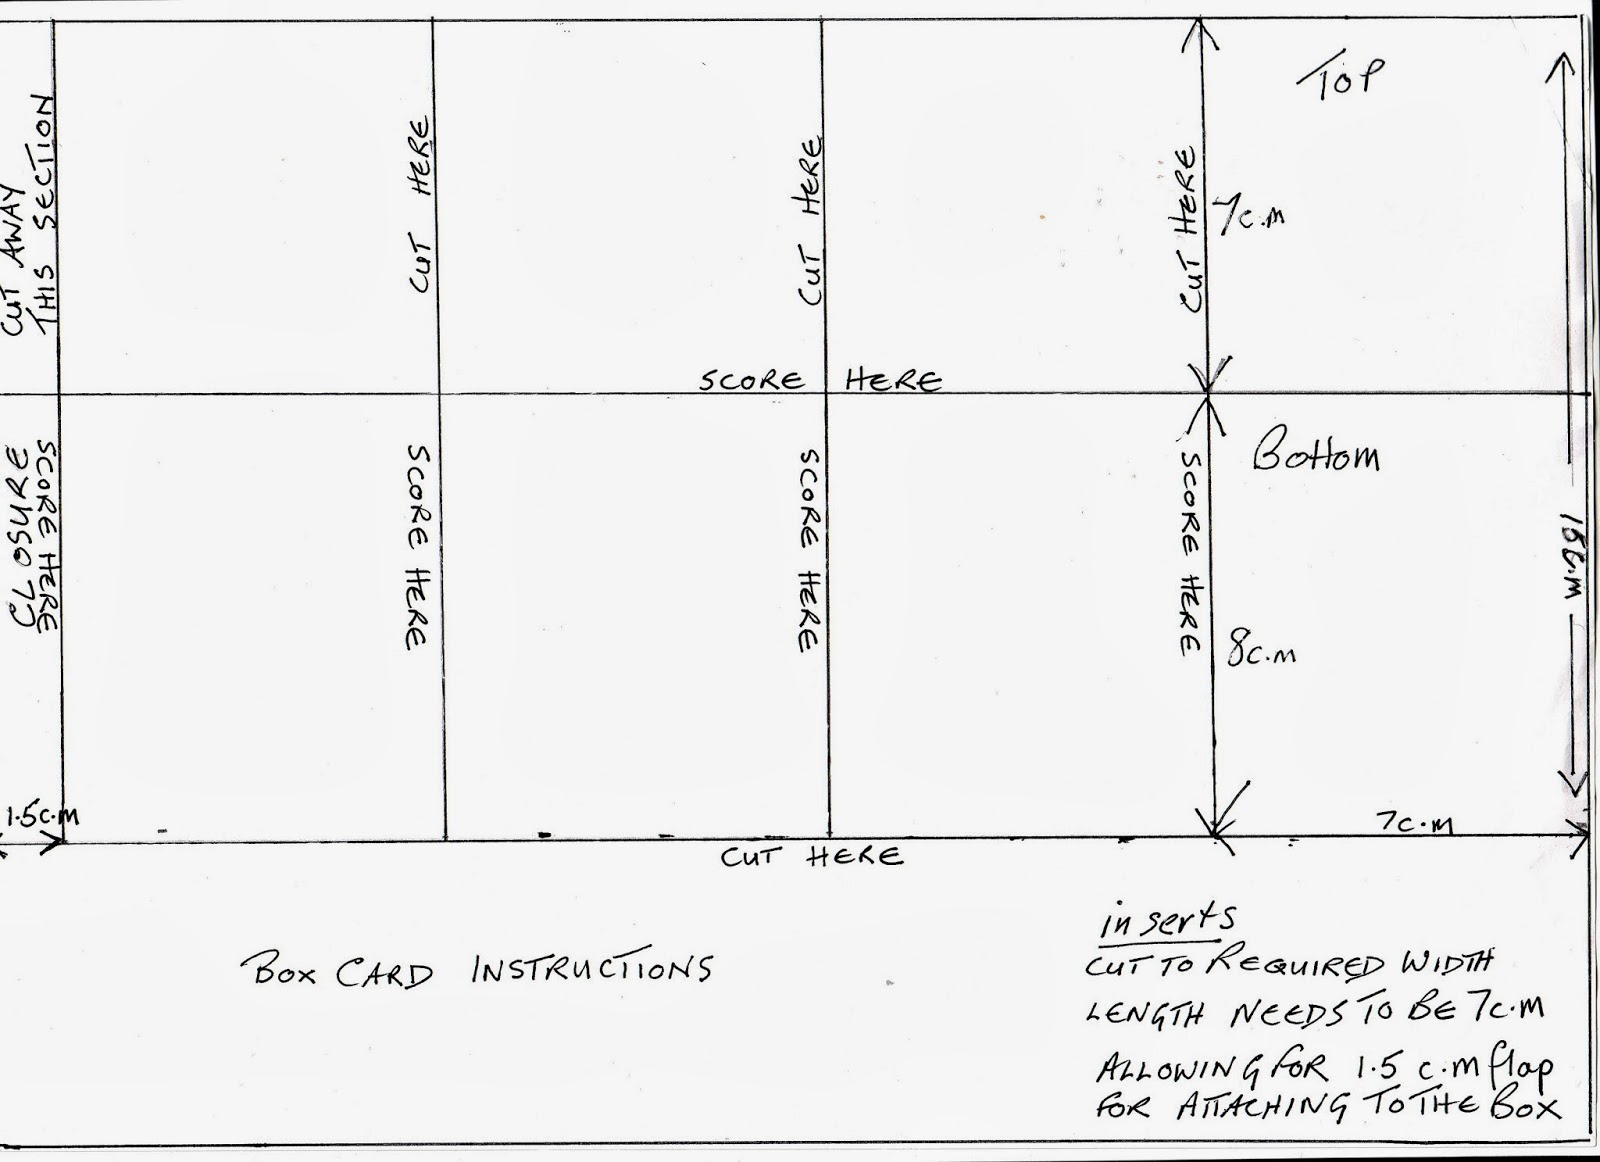
Exploding Box Card Instructions.

Hi Blogfriends as promised, but especially for Vicki, here are the measurements for the Exploding Box Card.

If you click on the instructions below and open them they will become clear to read.


I have scored all along the centre so that the top sections drop  down but it is possible to leave one at the back so that it stands up, it just depends on the effect required.
 
 As you can see with the box I made, all the lid section drop downwards.

 
 I have added this image as you can see inside, which shows the inserts attached.
You can then add what ever embellishments you wish by attaching them to the inserted strips.

 
I have not given measurements for the matting and layering as you may not do it quite the same but I took off half a cm. for each mat I made.
 
Thank you to all the kind people who left comments relating to this box.
 
Back soon,
Angela x


Sunday, 16 February 2014

Masterboard Monday

Hi Blogfriends, I felt as we have started a new year that a new technique was called for with the Masterboards.
Now, how do you think I made these?

 
I know there are those of you out there who will know immediately that I have used the Gelli Plate.
 
I have had the Gelli Plate for months and just not got round to using it, (I am sure I am not the only one that has stuff sitting there unopened lol!).
 
What a great piece of kit!!!!
 
I started by using the stash below but can't wait to try other methods.
Just in case you wondered why there is a soup tin, it makes lovely marks in the paint, especially if you twist it round as you place it on the surface.
 
If you need any instruction relating to this the company have a great website Gelli Arts.

 
The only difficult thing about this technique is knowing when to stop, oh! and making sure you have plenty of paper handy and somewhere to put the finished samples lol!
It is very addictive! but quick too.
I made all the samples in about an hour on Saturday night and made all these cards below Sunday morning from one A4 sheet and a little coloured card.


It may appear that the background is in one piece on the large card but to make the sample go further I have cut the pieces into three sections before matting and layering them.
I haven't put any sentiments on these cards yet as I don't know who they will be for but it's always good to have cards at the ready lol!


I am hoping to post more this week showing how I have used some of the other samples.
Hope you like my efforts so far.
 
Bye for now,
Angela x


Thursday, 13 February 2014

Lavinia Stamps Fairies on Fabric.

Hi Blogging Friends  thought it would be nice to use some of the heart downloads as we are approaching Valentine's Day.

This is the download I used which is available from Lavinia Stamps.


 I also used wadding for the backing and various hand and machine embroidery threads.

Begin by tacking the wadding to the back of the fabric and then using hand stitching, embroider the detail to enhance the design.

There is no need for complicated stitch work, I use stitches such as Chain stitch, Back stitch, Running stitch, Stem stitch, French Knots and Satin stitch.

It is particularly nice if you are able to add some metallic threads as these work well as focal points.

The pictures below show the work in progress.


To give depth to the finished design it is better not to fill the whole of the printed design with stitchwork. By leaving some of the print it appears to fade into the background.

I also had an idea to create embellishments by printing onto shrink plastic to use with the fabric.

It is possible to buy shrink plastic which works in an inkjet printer. I purchased mine from the Stamp Man.

After printing the images I cut them out ready to shrink as I only wanted the hearts not the background.
Don't forget to punch a hole at this stage before shrinking the plastic.

I know that some people are a little nervous when using a heat gun  as the plastic curls up but in my experience if you just keep going it will flatten out again.

I often turn it over half way and then continue to heat it and....

I finish off by placing my old iron over the top,while it is still warm, to flatten the plastic.

I decided that the plastic needed colour on the back as the white seemed a bit harsh and then finished it with a Lavinia Stamps Fairy Words stamp and embossed it.


When the embroidery is complete, sew around the outside of each heart, this can be done with hand or machine stitching, to attach the wadding to the printed fabric.


Sew two of the hearts together, catching the ribbon in the centre as you sew and pad the inside. I attached the embellishments to the ribbon and finished it with a bow.

The more I use the downloads for Needle Art, the more I like them.
The designs are so gorgeous that it is easy to add as much or as little stitchwork as you wish and then use the finished project as wall art, place mats, sections on clothing, bags, table runners, tags, cushions, book covers and of course greeting cards, it is just endless and I am sure you will think of other ways to use them.

        That's all for now, back soon.
                  Angela x

Friday, 7 February 2014

Masterboard Card Ideas

Hi Bloggy  friends here is another idea of how I used the last masterboards below.
Just to remind you of what they were like.


Every bit of paper can be used, you just have to use your imagination.
These are some new stamps from Chocolate Baroque, Steampunk Birds and there are nice images and text included.

I decided to make a Pop-up box card, they just looked like the sort of images that would work well with this type of card.
As you can see the box will lay flat so it will fit into an envelope and is good if you need to post it.

             First the outside.


And next the inside.


I have included some inner views to show what happens inside.
I used Spellbinders cog dies, Sizzix heart dies, a Tim Holtz label stamp for the sentiment inside and Choc Baroque on the lid.

I finished it off with stickles glue and heart brads.


You may have guessed this is a Valentine card and I am entering it in the Simon Says Monday Challenge, 'Love Notes' and the Wednesday Challenge, 'Have a Heart'.
I would also like to enter it in The Cheerful Stamp Pad #79-"Love / Valentine" .


 Now that I have worked out the measurements needed I shall definitely be making more, I love them and they are so simple to make.
If anyone needs the measurements just leave me a comment and I will post a tutorial on these box cards.
 
Back soon,
Angela x

Blogs I follow

01 09 10