Welcome to all my new followers, hope you enjoy the journey.
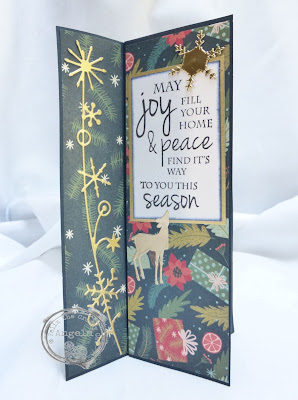
I am here today to show you a card made with more forgotten papers.
I was at the Craft Club this Saturday and did a class for the ladies and Brian (our one and only gentleman crafter), making Pinwheel Tower cards.
There are lots of these cards about on the internet usually giving you measurements for the sample but no where could I find instructions of how to resize the cards but I'll give you a clue as to how I've done it and I can tell you it's so simple.
The cards I've made here fit into a C6 envelope which measure about 11.5 c.m x 16.5 c.m (4 1/2" x 6 1/2").
- The card itself measures 11 cm x 15 cm x (4 1/4" x 6").
- The Tower section is 8 cm. (3")with the first panel attached, making it 13 cm (5 1/8").
- The other three panels measure 5.5 cm (2 1/ 8")x 15 cm (6").
I've left one side white so that I can write my own message on it.
This gives a clear view of the tower section.
The first panel folds to be attached to the tower and the rest are then added. I prefer glue but you can use double sided tape too.
I had several gold snowflakes left over from last year so this seemed like a good chance to use them up and some striped ribbon that's also been hanging around for a while.
The papers are freebies from magazines.
By now you may be starting to have ideas of your own of how you can decorate these cards.
Now you've seen the card you may be interested to know how to alter the size as promised
Once you have the basic width for the Tower section keep this the same and then decide which size envelope you would like the card to fit into.
- Measurements are then taken for the height and width taking off about 1.5 cm so the card will fit into the envelope easily.
- To get the measurement for the panels take the measurement you have for the width and divide by two, this will give you the panel size and then you're ready to do the construction.
I have a layout drawn up for this card which may help some of you if you'd like to have ago at making one of these and I'll be putting it on the page section soon.
Addendum
You can find the template in the pages section under Card Folds.
I would love to hear your comments too.
Many thanks for stopping by and happy crafting,
Angela x


.jpg)


.JPG)


.jpg)


5 comments:
I have trouble getting my head around the construction but it looks interesting... Shaped cards are so original and this one I have never seen before! x
These really are clever and pretty cards Angela. I also have to re-size cards too, and have spent many hours with a pencil and ruler lol. Take care and have a very happy week, Sue xx
What unique and eye catching cards with great folds and designs Angela. Thank you for the measurements and tips too x.
Such gorgeous cards, Angela - the format really calls to me, and I suspect there will be some experimentation with it in the studio. Love, love, LOVE!
Very clever and simple at the same time. I think it makes a great special occasion card and with photos on each panel you could rotate it for different views...or when different family members came round!
Post a Comment