Welcome to all my new followers, hope you enjoy the journey.
I am here today to show you a card made with some left-over pieces of Masterboards:
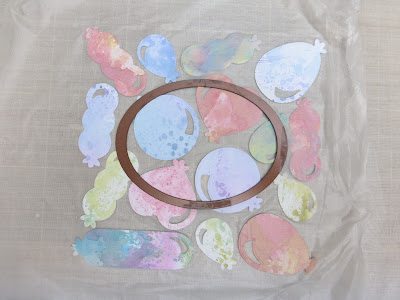
These balloons were all cut from the left-over pieces. I've had these for a while until I decided to have a go at making a Floating Die Cut card which is a new technique for me.
The first thing you need to do is arrange the images onto a piece of card so you know where the design needs to be in relation to the card you intend using.
Smooth over the design a piece of 'Press and Seal' which will attach it's self to the die cut pieces.
Place a shaped die in position. You may want to stick it down to prevent it moving.
Then remove this from the card.
And die cut.
Remove the die cut section and keep this for later.
Next attack sticky dots to all the balloons.
Work out the positioning of the sentiment and stamp that into the space.
Once that is done you can remove the covers on the sticky dots and attach it to the card then peal away the Press and Seal.
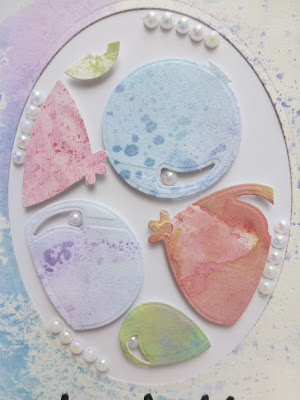
You can see here that the images appear to be floating which is how it gets it's name.
I finished the design with a few coloured pearls.
This is unusual for me as I left the background really plain but quite like it. It's definitely CAS.
I did pretty much the same with the die cut piece from the centre but turned it round.
Before attaching it to a 5"x7" card blank.
Again finishing this with pearls.
This was my first try with this style of card and I am looking forward to taking the idea a little further so watch this space.
Hope you liked those cards.
Many thanks for stopping by and happy crafting,
Angela x
I would like to enter this card in the following challenges:
Paperbabe Stamps Challenge #99 - Picture Inspiration.
Dragonfly Dreams Challenge - No Patterned Paper.


.jpg)


.jpg)


.JPG)


.jpg)


9 comments:
This is such a great technique (and rather fun, too!) and you did a great job with it. I love how you framed the balloons on the second card with an oval; it looks really cool. Thanks for playing with The House That Stamps Built.
Never seen or heard of this before. Fascinating! Will be something I definitely want to try when I get to the position of being able to die-cut some pieces.
Thanks for sharing - and something so new!
Hugs, Neet xx
Now that's what the press and seal was for.. how clever is that, like a helping hand to keep everything in its place and not a scrap of waste. Both fab designs and I love the colours you have used. I have some balloon dies that I used to use often when I was forever being asked to make children's cards but sadly everyone's children have grown up now. You've made me rethink about how I can use them now.
Thanks for the tutorial and joining in with the Paperbabe Stamps challenge your support is always welcomed. Good Luck!!
Hugs Tracey xx
What a clever way to use up all those inky painty scraps. I love your floating balloons, and so clever to create the sentiment "window" with such precision.
Alison x
You've beaten me to trying out this fabulous technique. I ordered the press and seal ages ago, I just have to find some extra hours in the day to play. I guess the best way to do it is to add it to the class schedule, then I have to make time lol.
Hugs Kimx
Awww those are adorable cards. I like those balloons die cuts!
Thank you for playing along with the August HLS Anything Goes With Dies Challenge!
Ooooo...I love your take on the floating die card!! So fun to see balloons used this time! Thanks for playing along in my "Try a New Technique" challenge over on THTSB!
Love all the balloons. Great designs. Thank you for joining in the Dragonfly Dreams challenge.
Mary
Pretty cool! I'm going to have to look for a youtube video lol. Thanks for sharing! Kel
Post a Comment